Friday, November 30, 2012

History of Frequency Generator

Frequency generator is an electronic device which is used to find the chemical changes in the body and also it is used to provide the required frequency for performing a desired operation in the circuit.Its works on the principle of sympathetic resonance.It states that if there are two similar objects and one of them is vibrating, the other will begin to vibrate as well, even if they are not touching.

History


The first modern publication on the subject of bio-frequencies (that this author is aware of) was by Nikola Tesla in 1890. Later, in the 1920's and 30's, Raymond Royal Rife is the man who began exploring this phenomena as it relates to people and the pathogens that make us ill.He built a wonderous microscope that used light to actually see these microscopic invaders with his own eyes. He watched, while applying sound in the radio frequency range in an attempt to create a sympathetic resonance for each sample. Later, in the 1990's cellular physicist, Hulda Clark PhD, also applied this science to uncover and "map out" the unique bio-frequencies generated by hundreds of parasites and bacteria that she found inside our bodies.  Rather than light, she uncovered these frequencies by sound, by using a "listening device" of her own design. (The Syncrometer) Her work helped to further support the validity of applied bio-resonance science.


Hardwork Can Never Ever Fails...
Best Luck...

Audio Frequency Vs Radio frequency

Generally,radio frequencies has more power than audio frequencies.The signal with more power penetrates more deeply.The first known frequencies from the 20's and 30's were in the millions of hertz range. 

 So why do most of the instruments built today only use low audio frequencies when original frequencies were much higher? 

 The FCC (Federal Communication Commission) is the reason why. In 1935 Congress created the FCC and by 1936 they began to regulate the airwaves. Before 1935 there were no regulations to prevent Dr. Rife from using his high frequencies output through a ray tube. The frequencies output through the ray tube would travel about 12 miles in each direction from his laboratory, and would. Dr.Rife said his equipment would “raise the devil” with all the radios. 


In 1936, Philip Hoyland built the first audio frequency instrument. (right)  In these early designs, a radio frequency was used to "carry" the new lower audio frequencies into the body. 

In the 1950s, Rife's research partners John Crane and John Marsh continued to build this lower audio frequency instrument, using simple off-the-shelf  technology of the day. From this time on, Dr. Rife’s original high frequencies were no longer used in any of the equipment, nor were his RF carrier waves used.   Most of today’s modern frequency generators are patterned after these early 50's style instruments. 


The RF carrier frequency gives the same harmonics and penetration as the earlier ray tube instruments.Hence we do use RF carrier wave.

Example:
When u hear a song ,it is audio frequency.These audio frequency are brought to your radio by radio frequency.The audio frequencies are "piggy backed" onto the radio frequencies.   


Hardwork Can Never Ever Fails...
Best Luck...

Square wave Vs Sine Wave

In the older instruments, all the generators outputs only radio frequency or 'RF'. Basically higher frequency range creates a wave form that is naturally rounded at the top and bottom.It is much more difficult to produce a very sharp signals at this high rate of oscillation.

With the advent of the new designs, then rate at which the signals are emitted dropped down which is called audio frequency.with the low frequency,the signal can be very sharp during turned on and off.This square wave design is used generally when running the lower audio frequencies. 

By Conclusion,
The signal with high frequency produces sine wave and the signal with low audio frequency produces square wave.


Hardwork can Never Ever Fails...
Best Luck...

Thursday, November 29, 2012

Satellite Communication

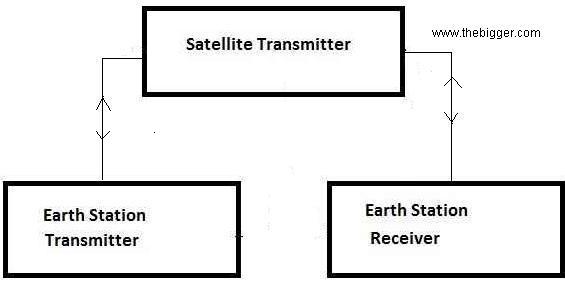
     In satellite communication, signal transferring between the sender and receiver is done with the help of satellite. In this process, the signal which is basically a beam of modulated microwaves is sent towards the satellite. Then the satellite amplifies the signal and sent it back to the receiver’s antenna present on the earth’s surface. So, all the signal transferring is happening in space. Thus this type of communication is known as space communication.
Two satellites which are commonly used in satellite communication are Active and passive satellites.
Passive satellites: It is just a plastic balloon having a metal coated over it. This sphere reflects the coming microwave signals coming from one part of the earth to other part. This is also known as passive sphere. Our earth also has a passive satellite i.e. moon.
Active satellites: It basically does the work of amplifying the microwave signals coming. In active satellites an antenna system, transmitter, power supply and a receiver is used. These satellites are also called as transpoder. The transmitters fitted on the earth generate the microwaves. These rays are received by the transponders attached to the satellite. Then after amplifying, these signals are transmitted back to earth. This sending can be done at the same time or after some delay. These amplified signals are stored in the memory of the satellites, when earth properly faces the satellite. Then the satellite starts sending the signals to earth. Some active satellites also have programming and recording features. Then these recording can be easily played and watched. The first active satellite was launched by Russia in 1957. The signals coming from the satellite when reach the earth, are of very low intensity. Their amplification is done by the receivers themselves. After amplification these become available for further use.
satellite Communication
Microwave communication is possible only if the position of satellite becomes stationary with respect to the position of earth. So, these types of satellites are known as geostationary satellites.
What are the requirements for a satellite to be geostationary?
1. Its revolutionary direction must be same as that of the earth, i.e. from west to east.
2. The time period of satellite’s revolution must be same to the time period of the rotation of earth along its polar axis, which is equal to 24 hours.
3. The equatorial plane of earth must be co planar with the orbit plane of the satellites revolution.
The name given to the orbit of the geo-stationary satellites is synchronous orbit. Due to this geo-stationary satellites are also called as geo-synchronous satellites. Geo-synchronous orbit is at a height of nearly 36000km from the surface of earth.
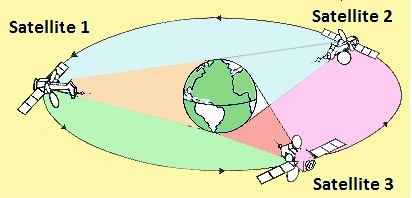
These orbits are capable of giving a successful communication link between two stations present on the earth. These satellites can handle communication up to large distances. But it is impossible for a single geo-stationary satellite to cover the whole earth and provide a communication link. Due to curvature of earth the stations will be out of sight  after covering some distance. If we want to cover the whole earth then we have to put three satellites onto the geosynchronous orbit. These satellites can cover the earth if all are inclined at an angle of 120to each other.
Communication geostationary satellite

www.TheBigger.com

A quick tour on breadboard


Bread Board is a great tool to design and test your circuits. You do not need to solder wires and components to make a circuit while using a bread board. It is easier to mount components & reuse them. Since, components are not soldered you can change your circuit design at any point without any hassle.

Structure of a Bread Board: Basically, a bread board is an array of conductive metal clips encased in a box made of white ABS plastic, where each clip is insulated with another clips. There are a number of holes on the plastic box, arranged in a particular fashion. A typical bread board layout consists of two types of region also called strips. Bus strips and socket strips. Bus strips are usually used to provide power supply to the circuit. It consists of two columns, one for power voltage and other for ground.
Socket strips are used to hold most of the components in a circuit. Generally it consists of two sections each with 5 rows and 64 columns. Every column is electrically connected from inside


The breadboard above is a single panel with two attached "bus strips." The second picture gives a little more detail. The green lines represent the internal connections of the breadboard. The bus strips on this breadboard are labeled + and - and are used for power. They run the length of the breadboard. Also, notice that the way that they are arranged, the inside edges of each bus strip is opposite polarity. This really helps when working with standard logic and most other ICs.The middle area is the component area, and this is where you will work your electronic magic.

Inside the Breadboard :

On some breaboards, the bus strips may be broken at the middle (Usually between row 31 and 33.) This splits your bus strips into 4 separate strips. This is useful if you are working with more than one voltage on your breadboard. If you need only one supply voltage on your circuit, then you should add a jumper across this gap to reconnect the bus strips.


Types of Breadboard :

1.Most commonly used one.

2.Breadboard with built-in power supply.

 This particular breadboard is no longer made. It has a +5V fixed supply capable of 1A, and a +- 15V supply. It also has two digital switches and two momentary switches connected to flip-flops. Lastly, it has two LEDs with current limiting resistors. If you are interested in getting a breadboard like this (or maybe something more modern) check eBay or google for "Powered Breadboard" or "Powered Protoboard." 


Courtesy:robocommunity.com


Hardwork Can Never Ever Fails...
Best Luck...


How light bulb glows?

An LED lamp uses light emitting diode as the source which comes under solid state devices.It offers long life and energy efficiency with low cost than those of fluorescent and incandescent lamps.


The chassis of the bulb is made of ceramic and houses the electronic ballast. Ceramic is used for its insulating and heat dissipative properties. The LED bulb is housed inside a phosphor coated glass dome.Remote phosphor is used to provide constant wavelength and enhance light output.  This also enables the LED to emit only a single colored light throughout its lifetime while also reducing glare at the same time.


Courtesy:engineersgarage.com


Hardwork Can Never Ever Fails...
Best Luck...


Tubelight starter-working

Nowadays, fluorescent lights are mostly used lighting system.It is being filled with mercury vapor.Electric charges are used to excite mercury atoms to provide ultraviolet light.starter is used in the tube light circuit to provide an initial current to filaments of the tube light.Look below to understand the purpose of starter.

Current will not pass in to the circuit as soon as the switch is pressed because the gas inside it is not ionized and the tube light behaves a open circuit.  Once the gas is ionized, it will provide a conduction path for the current to flow.Hence to ionize,an initial high is required for a short period of time across the filament of the main tube.This work is being done by a starter.
By conclusion,
To make the tube light to be ON ,it must be ionized using the starter current.


Courtesy:engineersgarage.com

Hardwork Can Never Ever Fails..
Best Luck...

Wednesday, November 28, 2012

CLAMP METER


Clamp meters are a very convenient testing instrument that permits current measurements on a live conductor without circuit interruption. When making current measurements with the ordinary multimeter, we need to cut wiring and connect the instrument to the circuit under test as shown in Fig.1.
Using the clamp meter, however, we can measure current by simply clamping on a conductor as illustrated in Fig.2. One of the advantages of this method is that we can even measure a large current without shutting off the circuit being tested.
Fig 1: Measurment using multimeter

Fig 2:Measument using clamp meter
HOW DOES A DC CLAMP METER WORKS:
Ordinary clampmeters used to measure AC currents work on the principle of electromagnetic induction caused by the alternating current flowing in the conductor which reverses direction causing a dynamically changing magnetic field. However, in DC conductors, the current flows in a fixed polarity. Consequently, the magnetic field around the conductor is fixed and does not change. Hence, a conventional clamp meter will register no reading.

A DC clamp meter works on the principle of the Hall Effect. The Hall Effect, named after Edwin Hall who discovered it 1879, states that when a conductor carrying current is placed in a magnetic field, a potential is induced across the conductor, transverse to an electric current in the conductor and a magnetic field perpendicular to the current. It is caused as the charge carriers, electrons or holes, experience a force known as the Lorentz force and are pushed to the sides of the conductor.
In general AC clamp meters operate on the principle of current transformer(CT) used to pick up magnetic flux generated as a result of current flowing through a conductor. Assuming a current flowing through a conductor to be the primary current, you can obtain a current proportional to the primary current by electromagnetic induction from the secondary side(winding) of the transformer which is connected to a measuring circuit of the instrument. This permits you to take an AC current reading on the digital display(in the case of digital clamp meters) as illustrated by the block diagram.

A clampmeter which works on the Hall effect has a sensor known as the Hall element. The Hall element is subjected to the magnetic field caused by the flow of current to be measured. This causes a small voltage across the Hall element. This voltage is amplified and measured.

coutesy       : www.electrotechnik.net
                       www.kew-ltd.co

Saturday, November 24, 2012

Cellular Repeater


A cellular repeater may be considered as a form of bi-directional amplifier. They will receive a signal from the local base-station and then re-broadcast it locally within the users premises - house, office, etc. The signal transmitted by the cellular handset or user equipment is packed up by the repeater and rebroadcast to the base-station.
Typically a cellular repeater will utilise an external directional antenna to communicate with the base station. There will then be a down lead to the repeater unit itself which will contain the antenna for radiating the signal within the premises.
Many simple cellular repeaters only allow use by one cell phone, but others allow the use of multiple phones.
In order to reduce cellular interference and congestion, the cellular repeater will transmit and receive on the same frequency. 

Repeater

Thursday, November 22, 2012

Radio Communication

Sound and radio waves are different phenomena. Sound consists of pressure variations in matter, such as air or water. Sound will not travel through a vacuum. Radio waves, like visible light, infrared, ultraviolet, X-rays and gamma rays, are electromagnetic waves that do travel through a vacuum. When you turn on a radio you hear sounds because the transmitter at the radio station has converted the sound waves into electromagnetic waves, which are then encoded onto an electromagnetic wave in the radio frequency range (generally in the range of 500-1600 kHz for AM stations, or 86-107 MHz for FM stations). Radio electromagnetic waves are used because they can travel very large distances through the atmosphere without being greatly attenuated due to scattering or absorption. Your radio receives the radio waves, decodes this information, and uses a speaker to change it back into a sound wave. An animated illustration of this process is given below (mouse-over the images for animations).
  • A sound wave is produced with a frequency of 5 Hz - 20 kHz.                                                                                                    
  • The sound wave is equivalent to a pressure wave traveling through the air.


  • A microphone converts the sound wave into an electrical signal.


  •    The electrical wave traveling through the microphone wire is analogous to the original sound wave. 
  • The electrical wave is used to encode or modulate a high-frequency "carrier" radio wave. The carrier wave itself does not include any of the sound information until it has been modulated.
  • The carrier wave can either be amplitude modulated by the electrical signal, or frequency modulated.
  • The signal is transmitted by a radio broadcast tower.
  • Your radio contains an antennato detect the transmitted signal, a tuner to pick out the desired frequency, a demodulator to extract the original sound wave from the transmitted signal, and an amplifier which sends the signal to the speakers. The speakers convert the electrical signal into physical vibrations (sound).

Clock Skew and jitter in digital

Jitter is nothing but the displacement of signal from its original position.This movement may lag or lead from its original or ideal position.As a speed increases, the edge deviation cause a significant problems like signal integrity,skew,race condition and other timing problems.

Classification 

1. cycle-to-cycle jitter
Cycle-to-cycle jitter is the change in an output’s transition in time in relation to the transition during the previous cycle.
2.period jitter
Period jitter is the maximum change in a signal transition from the ideal position in time. Phase jitter, also called long-term jitter, in the maximum change in an output signal transition from its ideal position over many cycles (typically 10 to 20 microseconds).
3.phase jitter
Phase jitter may leads to the displacement of phase from one signal to another.


Figure A: cycle to cycle jitter

 skew

Skew deals with the propagation delay of the output signal.It is the variation of propagation delay differences between output signals.Excessive skew, especially for clock signals, can cause race conditions and other timing errors that result in system data faults. At the very least, poor skew will force a slower maximum system speed, and this, in turn, will limit system performance.


 Hardwork Can Never Ever Fails...
 Best Luck....